Comprehensive judgment method for nuclear power facility EH system sealing ring failure reason
A technology of failure cause and determination method, which is applied in the direction of machine sealing ring test, measuring device, mechanical component test, etc., and can solve problems such as small lifting force, accurate analysis, and normal operation of nuclear power units.
- Summary
- Abstract
- Description
- Claims
- Application Information
AI Technical Summary
Problems solved by technology
Method used
Image
Examples
Embodiment 1
[0033] Example 1: Reason analysis of unreasonable structural design
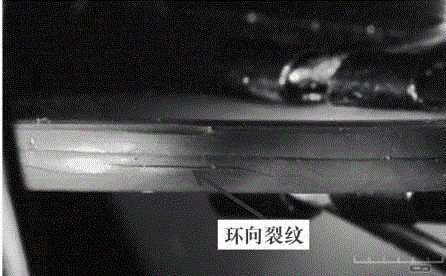
[0034] figure 1 This is the appearance of a failed O-ring. The molded parting line is at 90°, and there are circumferential cracks of different lengths on the side. It is preliminarily judged that this is due to the large compression force on the O-ring. beyond its elastic limit.
[0035] The image measuring instrument is used to measure the unused O-ring of the same specification. Its appearance size is φ15.22×2.71. The three-dimensional synthesis function of 3D SM is used to accurately measure the depth of the sealing groove. After calculation, the average of the groove The depth is 1.52mm. Next, check the size compatibility between the O-ring and the sealing groove. According to GB / T 3452.3-2005 "O-Rubber Seal Ring Groove Dimensions for Hydraulic and Pneumatic Applications", for a seal ring with a cross-sectional diameter of 2.71mm, the recommended compression ratio is 21.0% to 30.0%. However, the com...
Embodiment 2
[0037] Example 2: Analysis of the causes of unqualified processing quality
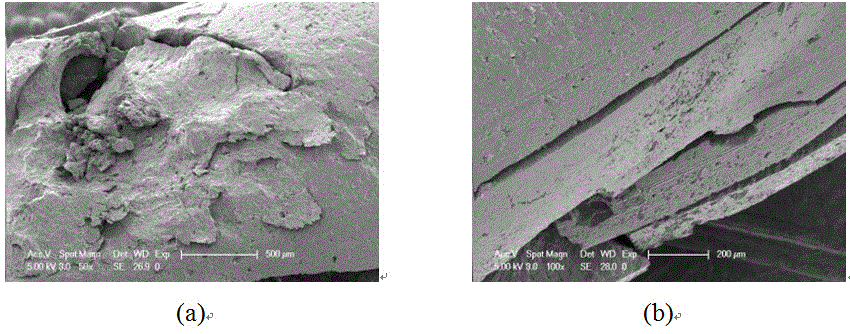
[0038] figure 2 It is the appearance of a failed O-ring under SEM. It can be seen that the surface of the O-ring is uneven and has a flaky peeling appearance, such as figure 2 (a) shown. In addition, there are obvious friction marks on the outer ring of the failed O-ring, such as figure 2 (b) shown. It is preliminarily judged that this is due to the rough processing of the sealing groove, which then wears the O-ring.
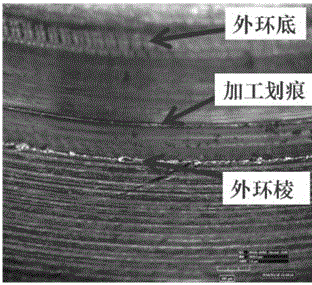
[0039] Further use the three-dimensional rotation function of 3D SM to observe the fine shape of the outer ring of the sealing groove, such as image 3shown. It can be seen that the outer ring edge of the sealing groove has no rounded corners, and there are processing scratches on the groove wall. These sharp edges will scratch the outer ring surface of the O-ring during sealing, thereby causing the sealing effect of the O-ring bad.
[0040] It can be concluded that the failur...
Embodiment 3
[0041] Example 3: Analysis of the Causes of Irregular Assembly
[0042] Figure 4 The macroscopic appearance of a failed O-ring. It can be seen that the O-ring is broken, and the fracture is seriously damaged. The fracture on the left is comminuted, and there is a radial crack near the fracture. Part of the material is missing in the fracture on the right, and some cracks are distributed on the fracture.
[0043] The external dimension of the failed O-ring is φ15.22 (inner diameter of the sealing ring) × 2.71 (section diameter), and the external dimension of the sealing groove is φ13.82 (inner diameter of the groove) × φ18.54 (outer diameter of the groove) × 1.48 (groove depth). According to GB / T3452.3-2005 "O-Rubber Sealing Ring Groove Dimensions for Hydraulic and Pneumatic Use", the outer diameter of the groove corresponding to the O-ring of this specification is 20+0.13mm, while the actual outer diameter of the groove is obviously 18.54mm. Small, so the outer diameter ...
PUM
 Abstract
Description
Claims
Application Information
 - R&D Engineer
- R&D Manager
- IP Professional
- Industry Leading Data Capabilities
- Powerful AI technology
- Patent DNA Extraction
Browse by: Latest US Patents, China's latest patents, Technical Efficacy Thesaurus, Application Domain, Technology Topic, Popular Technical Reports.
© 2024 PatSnap. All rights reserved.Legal|Privacy policy|Modern Slavery Act Transparency Statement|Sitemap|About US| Contact US: help@patsnap.com


