Bonding wire quality detection method
A quality inspection method and bonding wire technology, applied in the field of bonding wire, can solve problems such as low productivity and poor stability of the bonding process, achieve stability maintenance, reduce shutdown adjustment time, and improve productivity and work efficiency Effect
- Summary
- Abstract
- Description
- Claims
- Application Information
AI Technical Summary
Problems solved by technology
Method used
Image
Examples
Embodiment 1
[0029] With a mass fraction of 80% gold (99.99% purity) and a mass fraction of 20% silver (99.99% purity), through smelting-rough drawing-fine drawing-ultrafine drawing-annealing-winding, the wire diameter is 23μm alloy Line, do a test.
[0030] Breaking strength and elongation test: 10 samples of the above-mentioned alloy wires that have been put into the market in different batches were selected, among which batches 7-10 were after-sales problems of varying degrees of low bonding capacity and poor stability of packaged products after they were put into the market , this embodiment is tested according to GB / T 10573 non-ferrous metal wire tensile test method, repeated 3 rounds, to obtain the average breaking strength and elongation range, as shown in Table 1, the results show that the average breaking strength is lower than 7.4Cn exists quality risk.
[0031] Table 1 Tensile test results of bonding wire samples
[0032] Sample batch 1 2 3 4 5 6 7 8 9 10 ...
Embodiment 2
[0034] Wire passing test: According to GB / T15077 precious metal and its alloy material geometric dimension measurement method, respectively select 10 different batches of bonding wire samples as described in Example 1, and conduct tests to obtain the wire passing floating range of bonding wire , as shown in Table 2, the results show that within the floating range of the line warp, there is a quality risk if the difference between the maximum value and the minimum value is greater than 0.5 μm.
[0035] Table 2 The test results of the wire passing range of the bonding wire samples
[0036] Sample batch 1 2 3 4 5 Line diameter floating range (μm) 22.7-23.2 22.8-23.2 22.8-23.1 22.7-23.1 22.9-23.3 Sample batch 6 7 8 9 10 Line diameter floating range (μm) 22.9-23.2 22.7-23.3 22.5-23.3 22.5-23.1 22.6-23.4
Embodiment 3
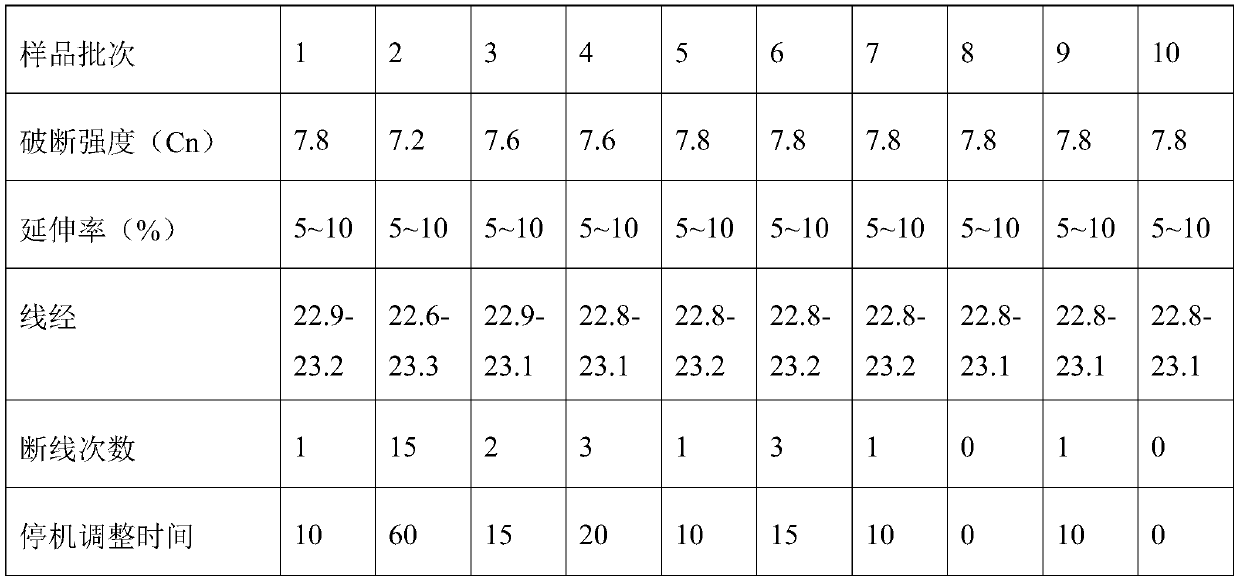
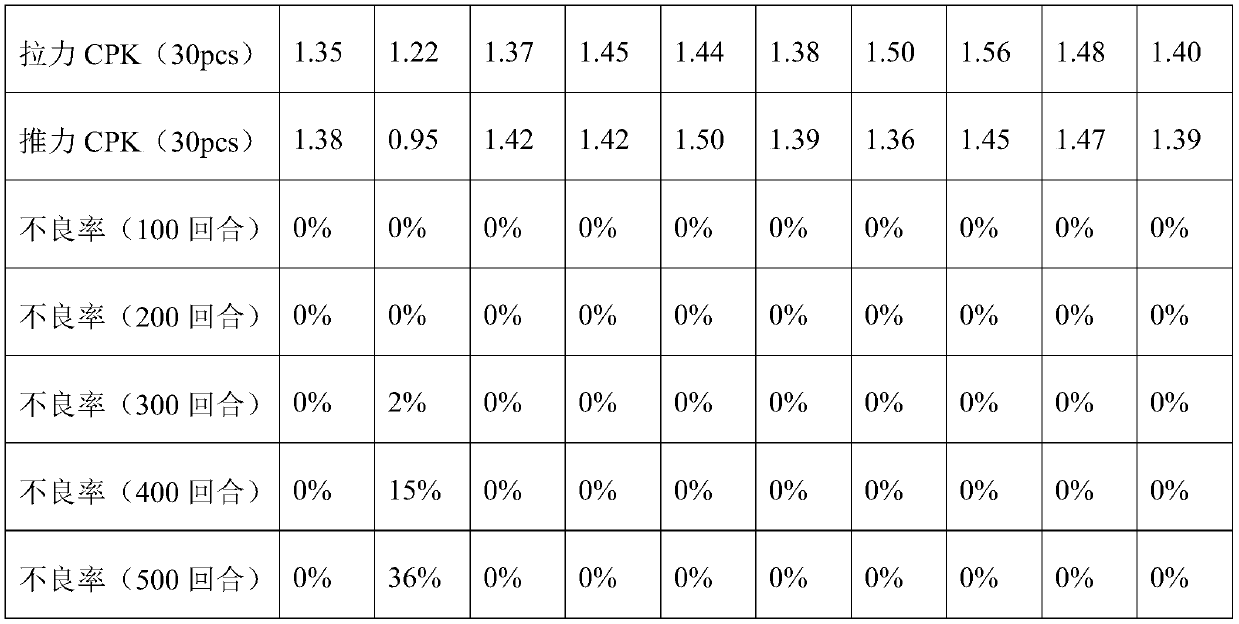
[0038] Stability test: get the full-axis rod (500M / axis) samples of 10 different batches of bonding wires described in Example 1 (in some embodiments, use 3000M / axis bonding wires), and use ultrasonic heating Pressure bonding equipment (KS-CONNX high-speed automatic bonding equipment), welding 200,000 wire arcs with the same length, each wire arc length is 2.5mm, the wire arcs include the wire used for burning balls, and each wire arc corresponds to For two solder joints, the welding time is 12-15 hours. The number of wire breakages and shutdown adjustment time are detected, as shown in Table 3. The results show that the bonding wire with more than 5 wire breakages and a shutdown adjustment time of more than 30 minutes has quality risks. .
[0039] Table 3 Stability test results of bonding wire samples
[0040] Sample batch 1 2 3 4 5 6 7 8 9 10 Number of disconnections 1 0 2 5 1 3 9 13 11 25 Shutdown adjustment time (min) 10 0 15 25 ...
PUM
| Property | Measurement | Unit |
|---|---|---|
| length | aaaaa | aaaaa |
| length | aaaaa | aaaaa |
Abstract
Description
Claims
Application Information
 - R&D Engineer
- R&D Manager
- IP Professional
- Industry Leading Data Capabilities
- Powerful AI technology
- Patent DNA Extraction
Browse by: Latest US Patents, China's latest patents, Technical Efficacy Thesaurus, Application Domain, Technology Topic, Popular Technical Reports.
© 2024 PatSnap. All rights reserved.Legal|Privacy policy|Modern Slavery Act Transparency Statement|Sitemap|About US| Contact US: help@patsnap.com


