Gap and surface difference combination measuring tool for vehicle body
A technology of gap surface and difference combination, applied in the field of measuring tools, can solve the problems of lack of special inspection tools for measuring surface difference, inconvenience, large size of feeler gauge, inconvenient to carry, etc.
- Summary
- Abstract
- Description
- Claims
- Application Information
AI Technical Summary
Problems solved by technology
Method used
Image
Examples
Embodiment Construction
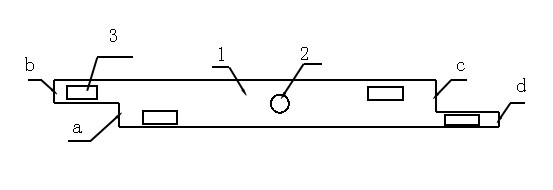
[0010] Such as figure 1 as shown,
[0011] The combined measuring tool for body gap and surface difference is made of a piece of GCr15 with a length of 100 mm, a width of 10 mm, and a thickness of 5 mm. Two opposite steps are respectively arranged at both ends of the measuring tool 1. The ends of the two steps and the steps at the end form a total of four Dimensions a, d; b, c. A through hole 2 is provided in the middle of the material 1 .
[0012] There are printing places 3 at the four sizes of the material.
[0013] A set of clearance and surface difference combined measuring tools consists of 7 pieces, and there are 7 groups of different gap and surface difference sizes. It can measure 14 common gap sizes and 14 common surface difference sizes.
[0014] See Table 1 Unit: mm
[0015] Part Number a b c d 1 5.5 4.5 6 4 2 4.5 5.5 5 5 3 4 6 3.5 6.5 4 1.5 8.5 2 8 5 0.5 9.5 1 9 6 7 3 6.5 3.5 7 7.5 2.5 ...
PUM
 Abstract
Description
Claims
Application Information
 - R&D
- Intellectual Property
- Life Sciences
- Materials
- Tech Scout
- Unparalleled Data Quality
- Higher Quality Content
- 60% Fewer Hallucinations
Browse by: Latest US Patents, China's latest patents, Technical Efficacy Thesaurus, Application Domain, Technology Topic, Popular Technical Reports.
© 2025 PatSnap. All rights reserved.Legal|Privacy policy|Modern Slavery Act Transparency Statement|Sitemap|About US| Contact US: help@patsnap.com


