
Defect observation apparatus

a technology of defect observation and apparatus, which is applied in the field of defect observation apparatus, can solve the problems of discrepancy between the coordinate system of the sem and the coordinate system of another inspection apparatus, and the mix of defects, so as to reduce the amount of reflected light/scattered light generated from defects, increase the integration degree of semiconductor devices, and reduce the effect of defect siz

Active Publication Date: 2020-03-17
HITACHI HIGH-TECH CORP
View PDF13 Cites 2 Cited by
  • Summary
  • Abstract
  • Description
  • Claims
  • Application Information

AI Technical Summary

Benefits of technology

[0009]With an increase in the integration degree of semiconductor devices, the sizes of patterns that are formed on wafers have become smaller, and the sizes of defects that are fatal to the production of semiconductor devices have also become smaller correspondingly. With a decrease in the defect size, there is a possibility that the amount of reflected light / scattered light generated from the defects may decrease and thus may be buried in noise.
[0010]In view of the foregoing, in an optical microscope mounted on a SEM, the amount of scattered light from defects needs to be increased. As a method for increasing the amount of scattered light from defects, it may be effective to shorten the wavelength of illumination, increase the output level of illumination, increase the power density, increase the detection solid angle of detection optics, and increase the light exposure time of the detector.
[0011]However, increasing the power density by reducing the illumination spot size, for example, can narrow the field of view. When the illumination spot size of an optical microscope is reduced in order to detect defects with high sensitivity, a phenomenon may occur in which in the field of view does not contain defects, which can result in failures in the detection of defects.
[0012]Therefore, the present disclosure provides a technique for achieving both high-sensitivity detection and suppression of failures in defect detection in an optical microscope mounted on a SEM.

Problems solved by technology

Such defects are mixed due to a variety of causes resulting from the production processes.
However, when such an identification method is used, there is a discrepancy between the coordinate system of the SEM and that of another inspection apparatus.

Method used


Image

  • Defect observation apparatus
  • Defect observation apparatus
  • Defect observation apparatus

Examples


embodiment 1

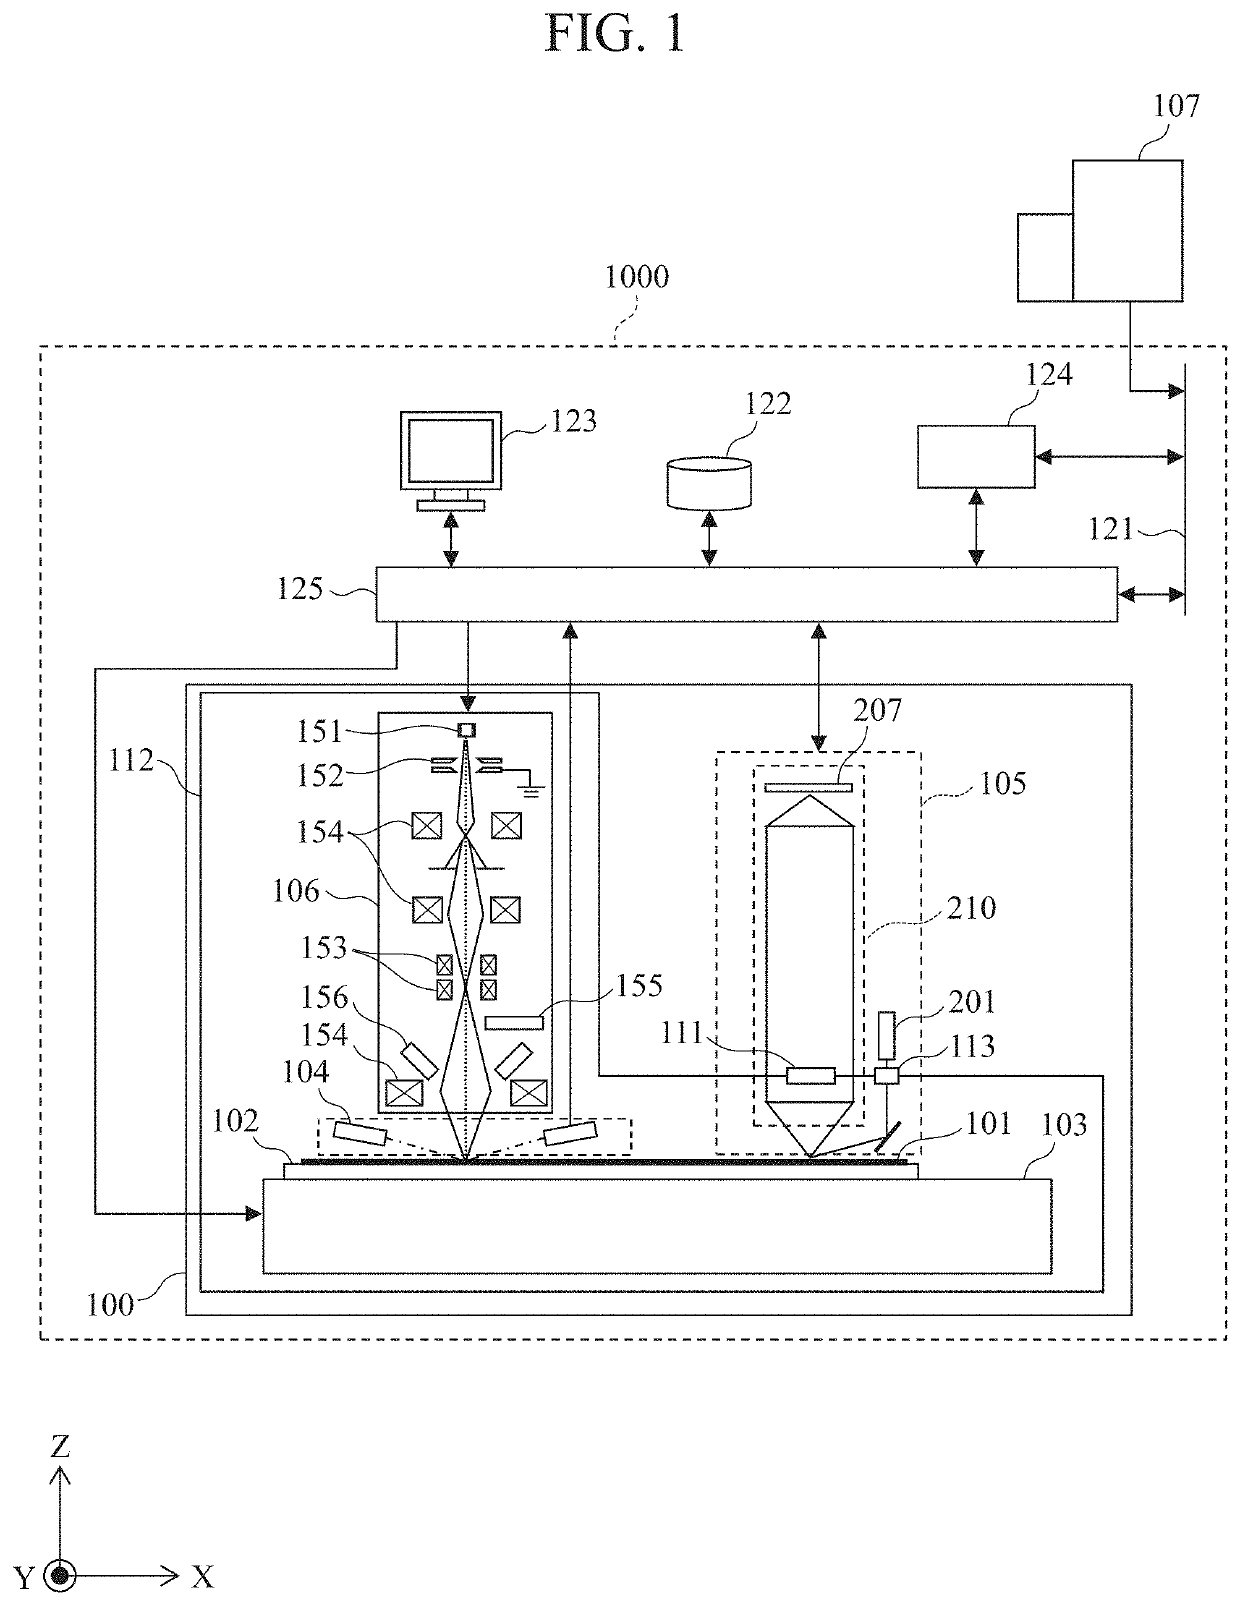
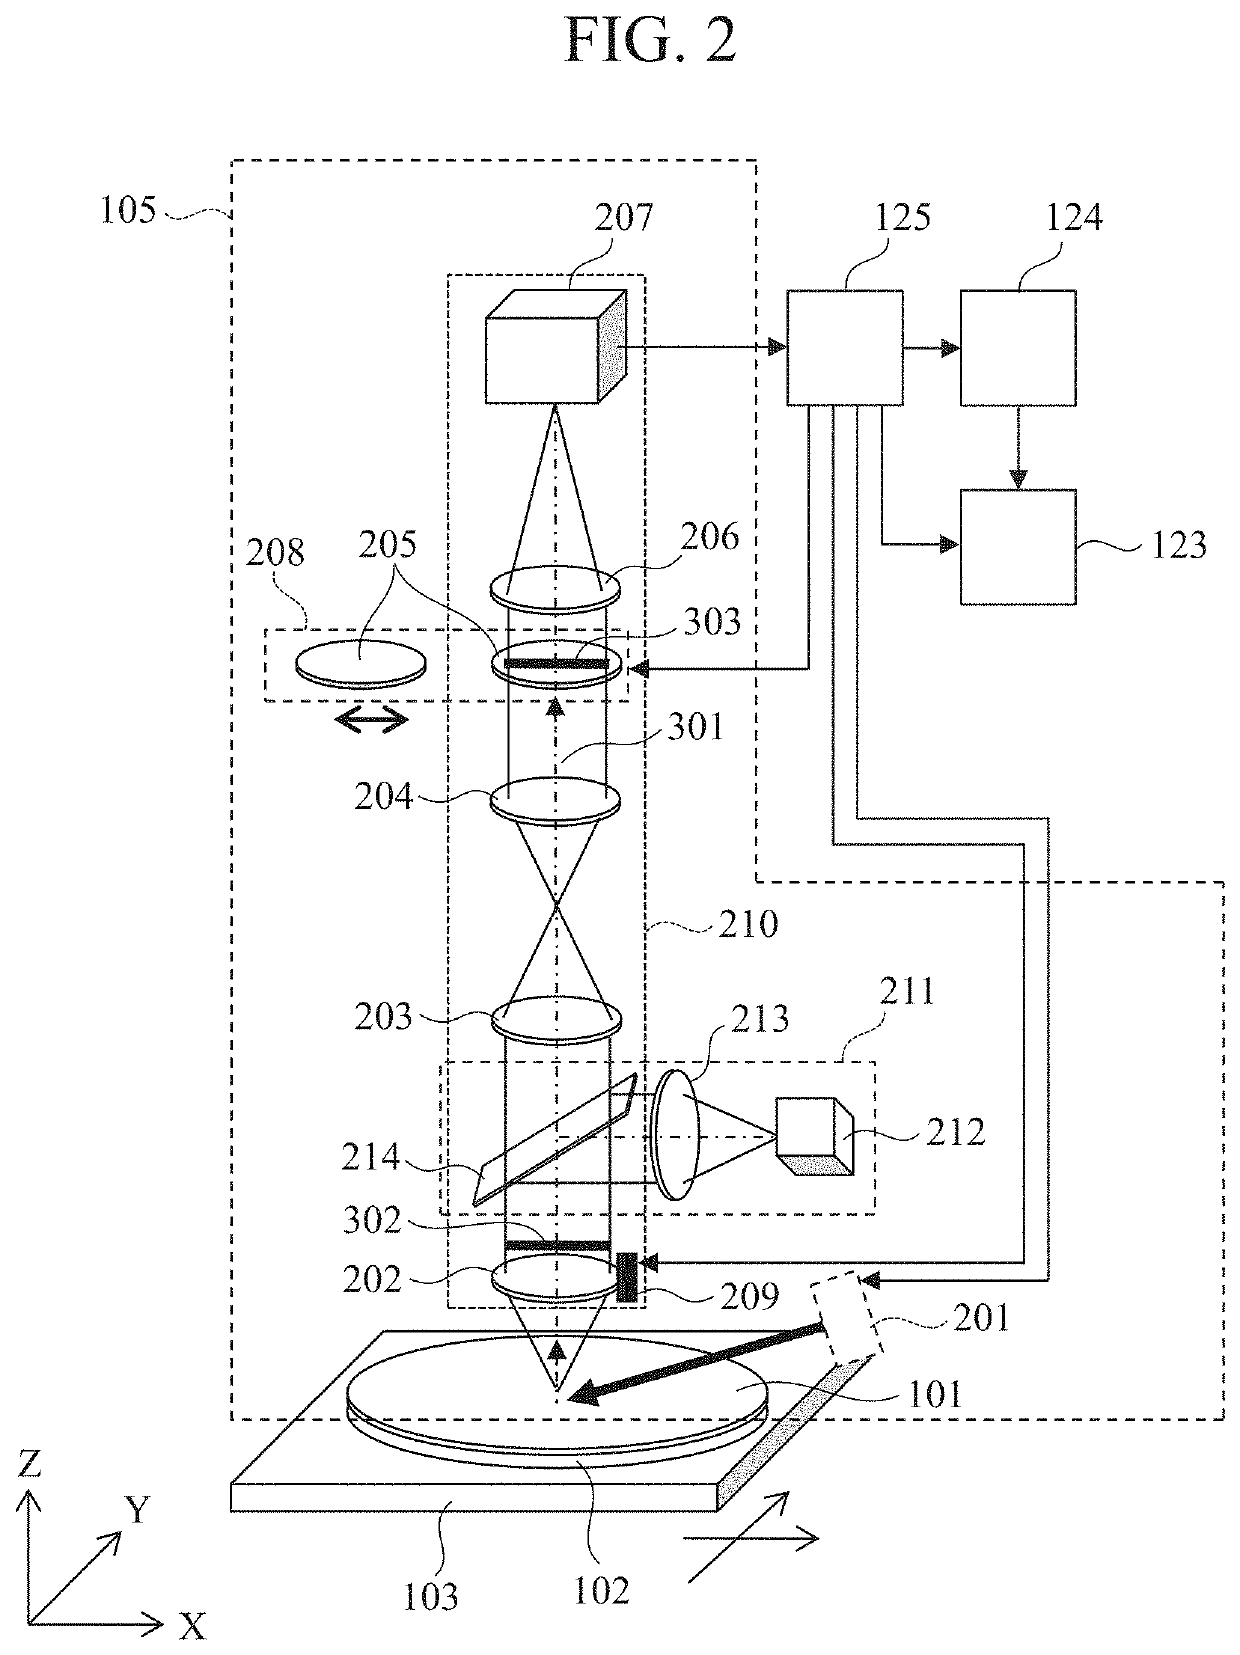
[0032]FIG. 1 is a configuration diagram of a defect observation apparatus in Embodiment 1. A defect observation apparatus 1000 mainly includes a reviewing device 100, a network 121, a database 122, a user interface 123, a storage device 124, and a control unit 125.

[0033]The defect observation apparatus 1000 is connected to a defect inspection apparatus 107, which is an external inspection apparatus, over the network 121. The defect inspection apparatus 107 detects defects on a sample 101 and acquires defect information. The defect information is information about a plurality of defects on the sample 101, and includes information such as a defect ID of each defect, the position coordinates of each defect, and the size of each defect. The defect inspection apparatus 107 may be any device as long as it can acquire information about defects on the sample 101.

[0034]The control unit 125 and the storage device 124 are connected to the defect inspection apparatus 107 over the network 121. D...

embodiment 2

[0129]Next, Embodiment 2 will be described. As the configuration of the reviewing device in this embodiment is the same as that in FIGS. 1 to 3, the description thereof is omitted herein. This embodiment is characterized in that when an image acquired with the optical microscope unit 105 contains a plurality of defects, an ID of each defect in the image can be identified.

[0130]A case where the field of view contains a plurality of defects will be described with reference to FIG. 6. Defect coordinates included in the defect information of the defect inspection apparatus 107 include a detection error 404 of the defect inspection apparatus 107 and link coordinate accuracy 403 between the defect inspection apparatus 107 and the reviewing device 100. A region 401 imaged by the optical microscope unit 105 is a narrow region of about several 100 μm. For example, in the case of the wide-field mode, the field of view has a size of 200 μm×200 μm, while in the case of the high-sensitivity mode...

embodiment 3

[0168]Next, Embodiment 3 will be described. As the configuration of the reviewing device in this embodiment is the same as that in FIGS. 1 to 3, the description thereof is omitted herein. This embodiment is characterized in that when it is determined that an image captured with the optical microscope unit 105 may contain a plurality of defects and there may also be a great difference in luminance between the defects, defect coordinates can be derived from the image of the optical microscope unit 105.

[0169]A case where the field of view contains a plurality of defects and the difference in luminance between the defects is greater than a predetermined value will be described with reference to FIG. 11.

[0170]Suppose that when there is a great difference in size between defects that are close to each other, the inspection mode and imaging conditions are adjusted to those for a defect 1101 with a smaller size (hereinafter referred to as a smaller defect). In such a case, as shown in an im...


PUM

PropertyMeasurementUnit
elevation angleaaaaaaaaaa
sizeaaaaaaaaaa
sizeaaaaaaaaaa

Abstract

A defect observation apparatus includes a storage unit configured to store defect information about defects detected by an external inspection apparatus; a first imaging unit configured to capture an image of a defect using a first imaging condition and a second imaging condition; a control unit configured to correct positional information on the defect using the image captured with the first imaging unit; and a second imaging unit configured to capture an image of the defect based on the corrected positional information.

Description

CLAIM OF PRIORITY[0001]The present application claims priority from Japanese patent application JP 2016-034706 filed on Feb. 25, 2016, the content of which is hereby incorporated by reference into this application.BACKGROUND[0002]Technical Field[0003]The present invention relates to a defect observation apparatus.[0004]Background Art[0005]In the production processes of semiconductor devices, if foreign substances or pattern defects, such as breaking of wires and short circuits, (hereinafter, foreign substances and pattern defects shall be collectively referred to as “defects”) are present on a wafer that is a semiconductor substrate, insulation failures of wires, short circuits of wires, and the like may occur. Such defects are mixed due to a variety of causes resulting from the production processes. Therefore, in order to mass-produce semiconductor devices, it is important to detect defects that are generated during a production process at an early stage, find out the source of gen...

Claims


Application Information

Patent Timeline
Patent Type & Authority Patents(United States)
IPC IPC(8): G06T7/80H04N7/18H04N5/235G02B21/36G06K9/62G06T7/00G02B21/06G02B21/00G01N23/2251G01N21/956G01N21/95G06T7/73G03F7/20G02B21/12H04N5/225H04N5/232
CPCG03F7/7065G02B21/06H04N5/23296G06T7/001H04N5/2256H04N5/23245H04N7/181G02B21/125G02B21/365G06K9/6202H04N5/2354G06T7/74G06T7/80G01N21/9501G01N21/956G01N23/2251G02B21/0016G06T2207/30148G06T2207/10061G01N2223/418G01N2223/6116H04N5/23238H04N23/56H04N23/667H04N23/74H04N23/69H04N23/698
Inventor OTANI, YUKOAOKI, KAZUOMINEKAWA, YOHEI
Owner HITACHI HIGH-TECH CORP
Learn More