
Hardness testing method and usage thereof

A detection method and hardness technology, applied in the direction of testing material hardness, etc., can solve the problems of test failure, crushing, failure to cover reinforcement, tough phase and matrix, etc.

Inactive Publication Date: 2012-05-30
王严岩
View PDF5 Cites 11 Cited by
  • Summary
  • Abstract
  • Description
  • Claims
  • Application Information

AI Technical Summary

Problems solved by technology

[0004] Hardness testing is basically non-destructive testing. After testing, it generally does not affect the performance and use of the inspected piece. Generally, it can perform 100% testing on workpieces or materials. It is convenient, simple, and fast to operate. It is the most basic and efficient engineering material (workpiece). One of the most commonly used and common mechanical performance testing indicators, especially in the matching selection of friction pairs and material selection under wear conditions, the hardness testing index is one of the most important and necessary testing items, but due to the combination Due to the heterogeneity of materials, the currently widely used hardness measurement methods (cloth, Rockwell, Vickers, Shaw, Richter, etc.) and equipment are not suitable for the following reasons:
[0005] 1. The composite material is discontinuous and homogeneous, and the indentation area produced by the indenter of the hardness tester currently used cannot cover the reinforcement, tough phase and matrix (such as the indentation of Low, Wei, Xiao, Li and microhardness), and the obtained hardness The value may be the hardness value of the matrix or reinforcement, ductile phase individual, not the overall (macroscopic) hardness of the composite material
[0006] 2. Composite materials are generally a combination of two materials with large performance differences. There is a large difference in strength and toughness. The indentation depth produced by the indenter of the hardness tester currently used is uneven, and there is a certain amount of plastic deformation. The indentation area produced by the gauge indenter may cover the reinforcement, tough phase and matrix, and the indentation deformation with a large uneven depth may cause a group of components with higher hardness and poor plasticity to be crushed in the composite material, resulting in The obtained hardness value is contrary to the basic concept of hardness testing, resulting in distortion of test data and test failure
[0007] In summary, so far there is no feasible, effective, applicable and correct hardness testing method for the above materials

Method used


Image

  • Hardness testing method and usage thereof
  • Hardness testing method and usage thereof
  • Hardness testing method and usage thereof

Examples


Embodiment 1

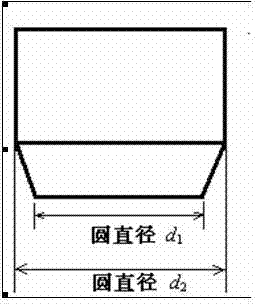
[0068] use image 3 , 4 The shown frustum-shaped detection indenter is used for the aluminum matrix composite material with the smallest volume fraction (27.7%) among the selected volume fractions. image 3 , 4 The end face is Ф6mm, Ф8mm, Ф10mm, Ф12mm conical) using the unique function of this system (the stress-strain curve test system of the load applied to the indenter and the displacement of the indenter), measured and displayed during the test (loading) process stress-strain curve. In this way, the indentation produced by the inspected sample under different indenter sizes is used to detect whether each component in the composite material is effectively covered (the minimum size of the indenter should be selected to determine the inspected material).

[0069] Figure 9 When using different sizes of conical indenters for the test, the stress diagram under different strains, it can be seen that the composite material corresponding to the above volume fraction (27.7%) ha...

Embodiment 2

[0072] use image 3 , 4 The frustum-shaped detection indenter shown in the figure is used for different volume fractions (27.7% 30.98% 40.2%) of aluminum matrix composites. We use this system to conduct indenter indentation depth and hardness test parameters, and choose the original planar indenter of this system ( The end face is Ф10mm conical—to ensure that the indentation area produced by the indenter of the hardness tester can cover the reinforcement, tough phase and matrix) using the unique function of this system (the stress-strain curve of the load applied to the indenter and the displacement of the indenter) test system), measure and display the stress-strain curve during the test (loading) as Figure 10 shown. In this way, it is used to detect whether any component of the tested sample is crushed (determine the crushed depth of the tested material).

[0073] And use a unique control method (depth control system) to control the indentation depth of the indenter ≯ th...

Embodiment 3

[0075] use image 3 , 4 The frustum-shaped detection indenter shown in the figure is used for aluminum, copper, and iron-based composite materials. We use this system to conduct hardness test parameters. Stress-strain curve test system of the applied load of the indenter and the displacement of the indenter), and the stress-strain curve is measured and displayed during the test (loading) as Figure 11 shown. In this way, it is used to detect whether any component of the tested sample is crushed (determine the crushed depth of the tested material). It can be seen that the composite materials of different matrices have different corresponding crushing depths, so different choices should be made in the hardness test.

[0076]


PUM


Abstract

A hardness testing method is characterized in that during hardness testing, a special testing pressure head with a plane end is used for applying load to an object to be tested, corresponding indentation is formed on the testing surface of the object to be tested, and the indentation and the added load are used as basis for hardness testing. The technical problem of hardness testing for representative multiple composites is solved creatively, and accordingly, different indentation area calculation modes and methods are developed by using a hardness testing system. The testing method is compatible and complementary with a traditional hardness testing method, so that testing (hardness) values obtained by using the methods can be compared, and a testing reference system is provided for hardness ratio of the composites to homogenous materials.

Description

technical field [0001] The invention relates to the technical field of hardness testing methods and design of hardness testing devices, and in particular provides a hardness testing method, which is especially suitable for hardness testing of multi-component composite materials. [0002] Background technique [0003] Composite materials are different from homogeneous materials, and the detection of mechanical properties has its particularity. For composite materials with different reinforcement (strength, toughness) phases, the mechanical performance detection is also different. Reinforcement phase composite materials are generally tested for compression or bending resistance. Ductile phase composite materials can generally only be tested for tensile strength, and hardness testing has always been difficult for most composite materials, especially the hardness testing of metal matrix composites with double continuous reinforcement (three-dimensional overall foam ceramic skel...

Claims


Application Information

Patent Timeline
IPC IPC(8): G01N3/42G01N3/44
Inventor 王严岩
Owner 王严岩
Learn More