Method for manufacturing surface crack sample for nondestructive testing sensitivity test
A production method and non-destructive testing technology, applied in the preparation of test samples, etc., can solve the problems that the production process is difficult to control, the shape cannot truly represent natural defects, etc., and achieve the effect of easy control of the production process, simple production method, and small size
- Summary
- Abstract
- Description
- Claims
- Application Information
AI Technical Summary
Problems solved by technology
Method used
Image
Examples
Embodiment 1
[0030] To determine the circumferential magnetization specification for magnetic particle testing for a certain steel grade, the goal is to detect fatigue cracks with a depth of 0.1 mm on the steel surface.
[0031] Circumferential magnetization detection test is carried out on this steel to determine its circumferential magnetization specification. Circumferential magnetization inspection test requires that the sample has surface crack defects perpendicular to its circumferential direction.
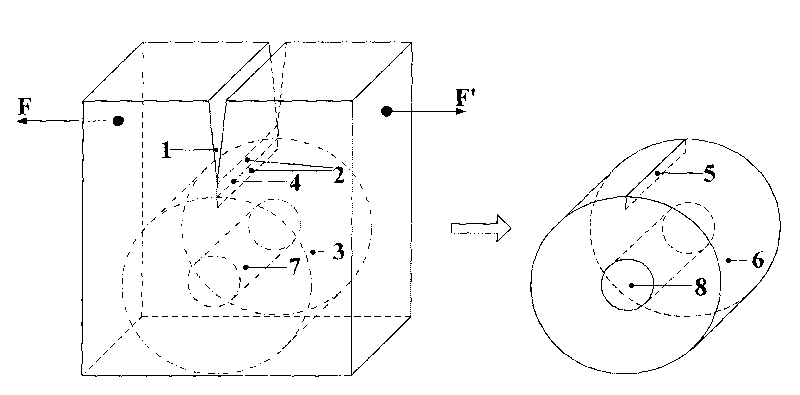
[0032] Select a square metal plate with the same material as the steel, 100mm in length and width, and 20mm in thickness, and machine a sharp notch on the center of one side of the metal plate. The opening depth of the sharp notch is 40mm, and the minimum opening width is 0.12mm, leaving an area of 100mm×60mm on the metal plate below the notch.
[0033] A load is applied to both sides of the notch on the axial loading fatigue testing machine, so that the root of the notch appears to crack th...
Embodiment 2
[0040] Through experiments, determine the minimum crack depth size that can be detected for a certain steel type in the magnetic particle detection of longitudinal magnetization.
[0041] Carry out longitudinal magnetization detection test. The longitudinal magnetization test requires that the sample has surface crack defects perpendicular to its length.
[0042] Select a square metal plate with the same material as the steel, 70mm in length and width, and 15mm in thickness, and machine a sharp notch on the center of one side of the metal plate. The opening depth of the sharp notch is 50mm, the minimum opening width is 0.12mm, and an area of 70mm×20mm is reserved on the metal plate below the notch.
[0043] A load is applied to both sides of the notch on the axial loading fatigue testing machine, so that the root of the notch appears to crack through the thickness of the entire metal plate, and a fatigue crack with a depth of about 3mm is prefabricated. Determine the position of ...
PUM
| Property | Measurement | Unit |
|---|---|---|
| depth | aaaaa | aaaaa |
Abstract
Description
Claims
Application Information
 - R&D
- Intellectual Property
- Life Sciences
- Materials
- Tech Scout
- Unparalleled Data Quality
- Higher Quality Content
- 60% Fewer Hallucinations
Browse by: Latest US Patents, China's latest patents, Technical Efficacy Thesaurus, Application Domain, Technology Topic, Popular Technical Reports.
© 2025 PatSnap. All rights reserved.Legal|Privacy policy|Modern Slavery Act Transparency Statement|Sitemap|About US| Contact US: help@patsnap.com


